GEAR REVIEW: Jacks 'R' Better Weather Shield
20 Oct 05
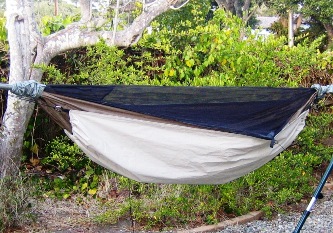
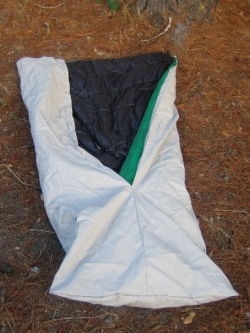
JRB Weather Shield Undercover on HH Backpacker
BIOGRAPHY
Name: Jeff Jackson
Age: 29
Gender: Male
Height: 5 10 (178 cm)
Weight: 185 lbs (84 kg)
Website: http://www.tothewoods.net/
Email: jwj32542 at yahoo dot com
Location: Monterey, CA, USA
Backpacking Background:
I have been backpacking for about eleven years. I started as a three-season overnight-only hiker in the North Georgia mountains, and have since hiked in California, Colorado, Georgia, New Jersey, New Mexico, Pennsylvania, South Carolina, and Virginia. Weather has generally been mild (50-85 F / 10-30 C), although I sometimes hike in winter (~20 F/-7 C) as well. My current pack weight is roughly 30 lbs (14 kg). When I go on a 2-3 day hike with my children (6 and 10), my pack may edge up to 40 lbs (18 kg). I am most often a hammock camper, but I still use a tent when my wife comes along.
PRODUCT INFO
- Manufacturer: Jacks R Better, LLC
- Product: Weather Shield (2005)
- Undercover (bottom) and Quilt Cover (top)
- Website: http://www.jacksrbetter.com/
| Listed Specs: | Measured Specs: | |
| Undercover (Bottom) |
|
|
| Quilt Cover (Top) |
|
|
MSRP: $65 for the set
- Undercover: $45 if purchased separately
- Quilt cover: $25 if purchased separately
PRODUCT DESCRIPTION
The Jacks 'R' Better (JRB) website describes the Weather Shield as a two part system, consisting of a top and bottom, designed to add wind and moisture protection to their line of hammock quilts. Made of microporous polypropylene (similar to Dri Ducks and O2 rain gear), it is waterproof and breathable. (Frogg Toggs is a trilaminate micro-pro, whereas the Weather Shield is a bilaminate micro-pro.)
The undercover is designed to be two inches wider than the Nest underquilt, so it can provide protection without compressing the Nest's insulation. Just like the Nest, the Weather Shield undercover has grosgrain loops on the corners, drawstrings along the short ends, and ladder loops aligned with the Hennessy Hammock side tie-outs. It is designed to be used with the JRB suspension system, but can be used with or without the JRB underquilts: as a simple undercover, or holding additional bottom insulation against the hammock. When used over the Nest, JRB claims it will add 6-10 F (3.3-5.5 C) of warmth for the occupant.
The top cover is designed just like a camping quilt. With a footbag and an open top, it can cover most top quilts and sleeping bags. It can be used as a thin summer blanket, or will add 6-10 F (3.3-5.5 C) to a quilt or bag during colder weather. It is very useful in humid climates with thick, rolling fog.
FIRST IMPRESSION
When I first opened the Weather Shield set, I was surprised that it would actually be waterproof. The material feels almost like a thick bedsheet, and it's a bit stiff. For my first test, I blew through the material to gauge its breathability. I could breathe through it with the same resistance level as DWR fabric, so I concluded that it is breathable and will provide a good windblock. For the next test, I checked waterproofness by shaping part of the Weather Shield into a "bowl" and putting a paper towel underneath it. I dumped some water into the depression, and after letting it set for more than four hours the paper towel had absolutely zero moisture on it. When I dumped the water out, the Weathershield had not absorbed any moisture, and what little water left was beaded up on the fabric's surface. I wiped it off with the paper towel, and the Weathershield was dry. I conclude that it's 100% waterproof at the "normal" water pressures in which the Weather Shield will likely be used.
INSTALLING THE UNDERCOVER
The Nest underquilt's suspension system supports the Weather Shield undercover. The system consists of two 26 (66.0 cm) lengths of shockcord and four small carabiners. The shockcord is hitched to the hammock support lines, then a carabiner clips to a loop at each end of the shockcord and to each grosgrain loop on the undercover's corners. This is a very simple, effective system requiring no alterations to the hammock. The suspension system can support the Nest, the Nest and the undercover, or just the undercover.
 |
 |
where the mini-biner attaches |
To install, I hitch the shockcord onto the hammock support ropes, then clip the carabiners onto the shockcord and onto the grosgrain loops on the undercover's corners. Repeating this on the other end supports the undercover underneath the hammock. Next, running the HH side tie-out lines through the ladder loops on the long sides of the undercover snugs it closer to the bottom of the hammock. At this point, tightening the drawstrings snugs the Undercover to the hammock for its entire length. Tension is easily adjusted by sliding the hitch along the hammock support rope. While I have to exit the hammock to adjust this tension, this process is generally only necessary upon installation. Once the undercover is installed, it can be left on the hammock and packed without being disconnected.
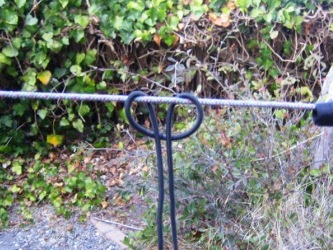 |
Connect the suspension system to the HH support with a simple hitch |
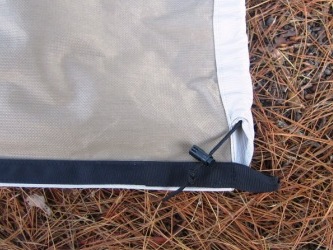
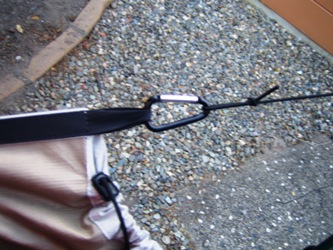 |
Connect the mini-biner to the grosgrain loop |
 |
Almost done! Here is the connected suspension system |
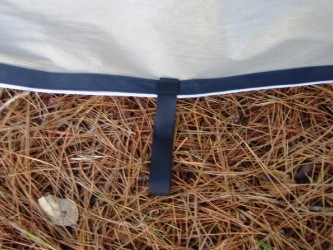
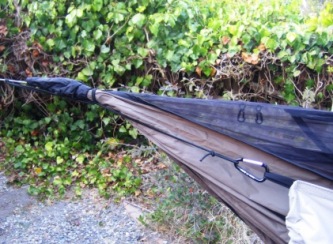
 | Next, pull the HH's side tie-out loop through the WS's Ladder Loops. If the HH tie-out is attached higher (i.e. to a tree instead of staked to the ground), I can use the upper hole in the Ladder Loop to improve the fit. |
 |
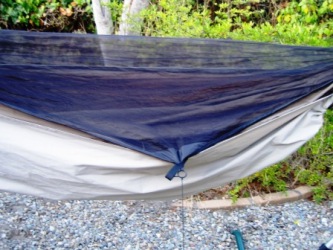
Cinch the drawstring enough to snug it to the HH...not too tight |
|
All done! |
USING THE UNDERCOVER
I have used the undercover for several nights, and it has provided excellent wind protection each night. I have not experienced any rain or heavy fog yet, but based on my kitchen test I am confident that it is waterproof.
I did have some trouble when it affected the fit of my Nest underquilt. Although designed to fit over the Nest, the undercover I received was 2" (5 cm) shorter than my Nest...that difference created gaps between the underquilt and hammock, which causes cold spots in the hammock.
To enter the Hennessy with the Weather Shield undercover installed, I simply pull the undercover aside to uncover the opening, then sit and enter like normal. After pulling my feet inside the hammock, the shockcord suspension pulls the undercover back into place.
To exit, I stick my feet out of the HH slit and pull the undercover aside. Then there is plenty of room to stand on the ground and exit the hammock.
I have tried putting blankets and sleeping bags inside the undercover to provide insulation, and my results thus far were mediocre. The sleeping bags tended to be too narrow at the foot end, so I had to keep my feet over one small spot inside the hammock or I got cold. When I used common house blankets, the sides slid down to the bottom, leaving gaps near my shoulders. Also, pulling the undercover tight enough to keep the insulation against my back and under my knees caused it to compress a bit under my butt. It was still warm enough to sleep in at about 55 F (13 C), though.
Lastly, adding the Nest and Weather Shield caused the shockcord to stretch too much. Tightening the suspension by sliding the hitch down the hammock support did not solve the problem. I tried doubling up the shockcord, which worked decently. JRB recommended tying an overhand knot in the center of the shockcord to shorten it, then connecting it to the hammock supports.
While I will continue to use my Nest on hikes, I think I can find solution to the insulation and shockcord problems with more testing. If I did not have the 3 Season Set, I would likely use the Weather Shield as a primary component in a taco-like insulation setup.
As an additional note, the Weather Shield bottom will add versatility to a system. If I am camping in moderate temps, I might take the Nest and WS bottom only. On colder nights, I can put the Nest on bottom and sleep in my warm clothes with the WS as a blanket. On warmer nights, I can put the WS on bottom and use the Nest inside where I can ventilate better.
USING THE QUILT COVER
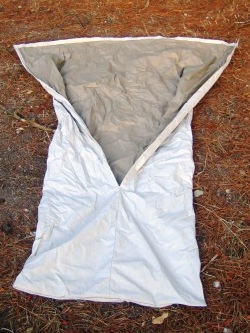
The quilt cover is simply a rectangle of microporous polypropylene. The long edges are folded to the center and a seam is run along the foot area. Then, a 21" (53 cm) seam is run on the long edge near the foot end to create a foot box. That's it! Very simple. The finished dimensions are: 59" (150 cm) wide across the top when opened fully, 28" (71 cm) wide at the footbox, and 75.5" (192 cm) long down the center-line.
To use it, I just get inside the quilt (or sleeping bag), then put my feet inside the footbox and lay it on top of me. I have also used the quilt cover as a blanket by itself to 65 F (18 C). I was surprised that such a thin blanket kept me warm enough at that temperature, but it did. The Weather Shield was too stiff to drape as well as the down quilt I normally use, and it made some noise when I moved, but for the decreased bulk and weight I was rather impressed. Just like other products from this material, I think the noise and stiffness will diminish with further use.
I think the quilt cover would be an excellent piece of gear for a trip on which I might cowboy camp sometimes. It's a nice trade-off for a full bivy that's still useful in a hammock.
 |
 |
DURABILITY
This set is made for lightweight hikers who know how to take care of their gear. Therefore, it is not recommended for rugged uses where it will be exposed to abrasion or puncture. With proper care, this set appears like it will hold up as well as other microporous polypropylene products (like Dri Ducks). If an abrasion or tear develops, it can be easily repaired with duct tape.
WHAT I LIKE
- It Works! The only place I have ever experienced wetness is at the hammock's ends, where windblown rain comes under the tarp and wets the underquilt's ends. The Weather Shield protects the ends of the quilt from this rain and from ground splash. Although the Nest's DWR provides good wind protection, the Weather Shield provides an excellent wind block when used alone.
- Versatility. The Weather Shield bottom can be used in conjunction with the JRB underquilts, by itself, or as a "taco" to hold additional insulation under the hammock. I could even wrap it around me as a camp blanket. The quilt cover can be used inside the hammock to add warmth and moisture protection, or could be used on the ground for additional protection when using a tarp or cowboy camping.
- Customer Service. Responsive, patient, knowledgeable. As a cottage gear business, the Jacks know that personalized service is how they can achieve a competitive advantage over the big box producers, and they followed through with personalized service. They provided timely answers for every email and even explained the product's use in a lengthy phone call.
WHAT I DONT LIKE
- Fit. I had some difficulty fitting the Weather Shield bottom to the Hennessy Hammock. I improved the fit by extending the length of the grosgrain loops with loops of thin cord, but JRB may increase the length of the next batch of Weather Shield undercovers to address this issue.
- Bulk/Weight. Considering the undercover's function, I could make a simple "taco" or top cover that would compress smaller and possibly weigh less. To be fair, however, a silnylon undercover would not be breathable, a DWR one would not be waterproof, and one from a waterproof/breathable material would likely be more expensive. Comparing the top cover, it's possible to purchase a full bivy with a waterproof bottom and waterproof/breathable top for 6.5 oz (184 g). Of course, that one also costs over $200!
The Weather Shield's bulk and weight are simply trade-offs for a quality piece of gear at a reasonable price.
SUMMARY
The Weather Shield is a great product! Since I am trying to cut weight from my pack, I will not carry the Weather Shield on every trip, but I can foresee bringing it on certain hikes. For example, if I am confident of warm nights I might carry the undercover instead of the Nest underquilt to save weight and bulk. If I am expecting extremely heavy rains or rolling fog, I will take it in addition to the Nest for added protection.
For further details on my testing, see the Weather Shield Test Page.
DISCLOSURE: I designed Jeffs Pack Cover and Gear Hammock that is for sale on the JRB website. My relationship with JRB deals only with this pack cover. I have no interest in the Weathershield other than as a user. JRB did not offer me any benefits from this review, financial or otherwise. This review reflects my impartial opinion based solely on my use of the product.