Jacks 'R' Better Mount Washington Underquilt (MWUQ)
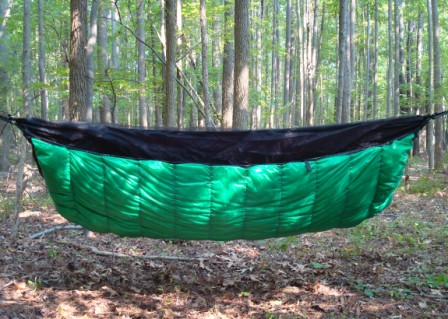
Mt Washington Underquilt on a JRB Bear Mountain Bridge Hammock
Photo by JRB
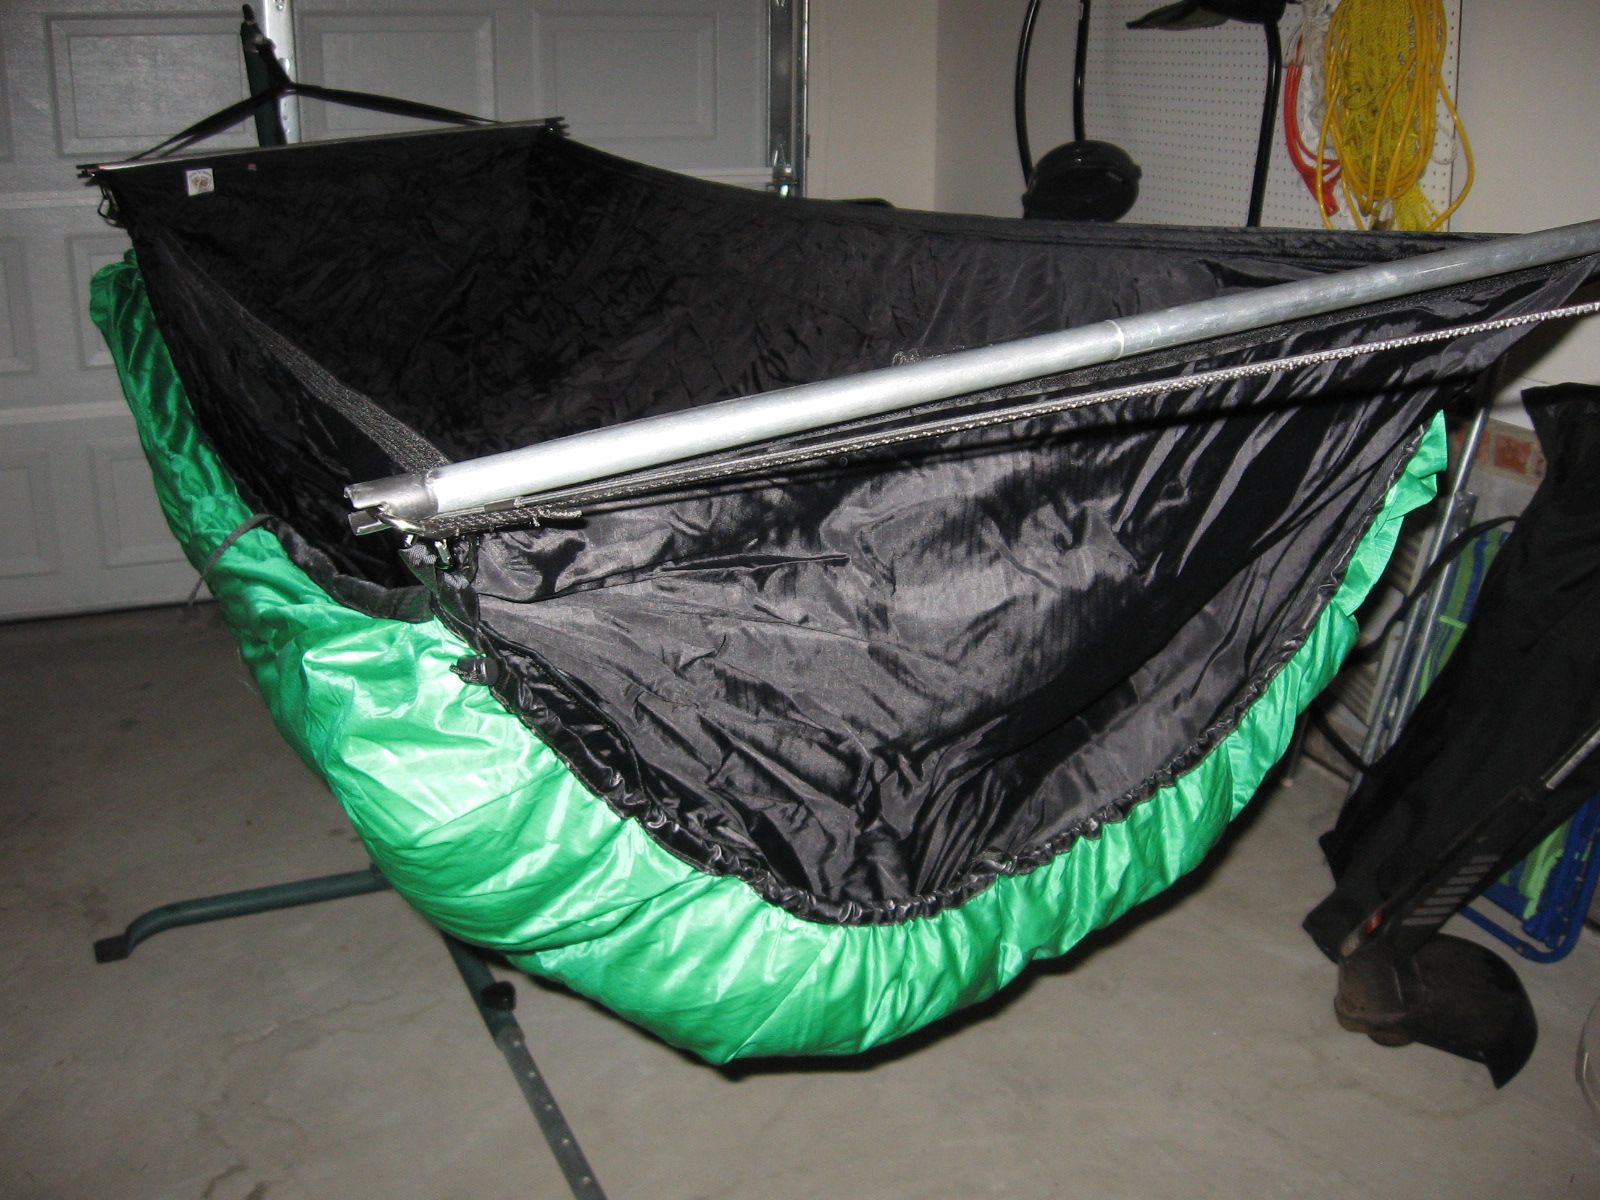
The Mt Washington Underquilt (MWUQ) is JRB's warmest quilt, rated to 0-10 F (-18 to -12 C). Unlike JRB's other quilt models, the MWUQ has a dual-differential cut so it shapes to the hammock and a series of darts on the outer shell to keep the loft from compressing no matter how tightly it is snugged to the hammock. It is made from 1.1 oz ripstop DWR nylon with 800fp down with 3" (7.6 cm) baffles and overstuffed to 4-5" (10.2-12.7 cm) of loft, and uses the standard JRB suspension system to attach to any hammock style. It comes standard with a large JRB compression sack.
| Manufacturer: Jacks R Better, LLC Product: Mount Washington Underquilt (2008) MSRP: $359.95 Website: http://www.jacksrbetter.com/ |
|
Discuss this review HERE.
| 13 Dec 08 - Initial Details | |
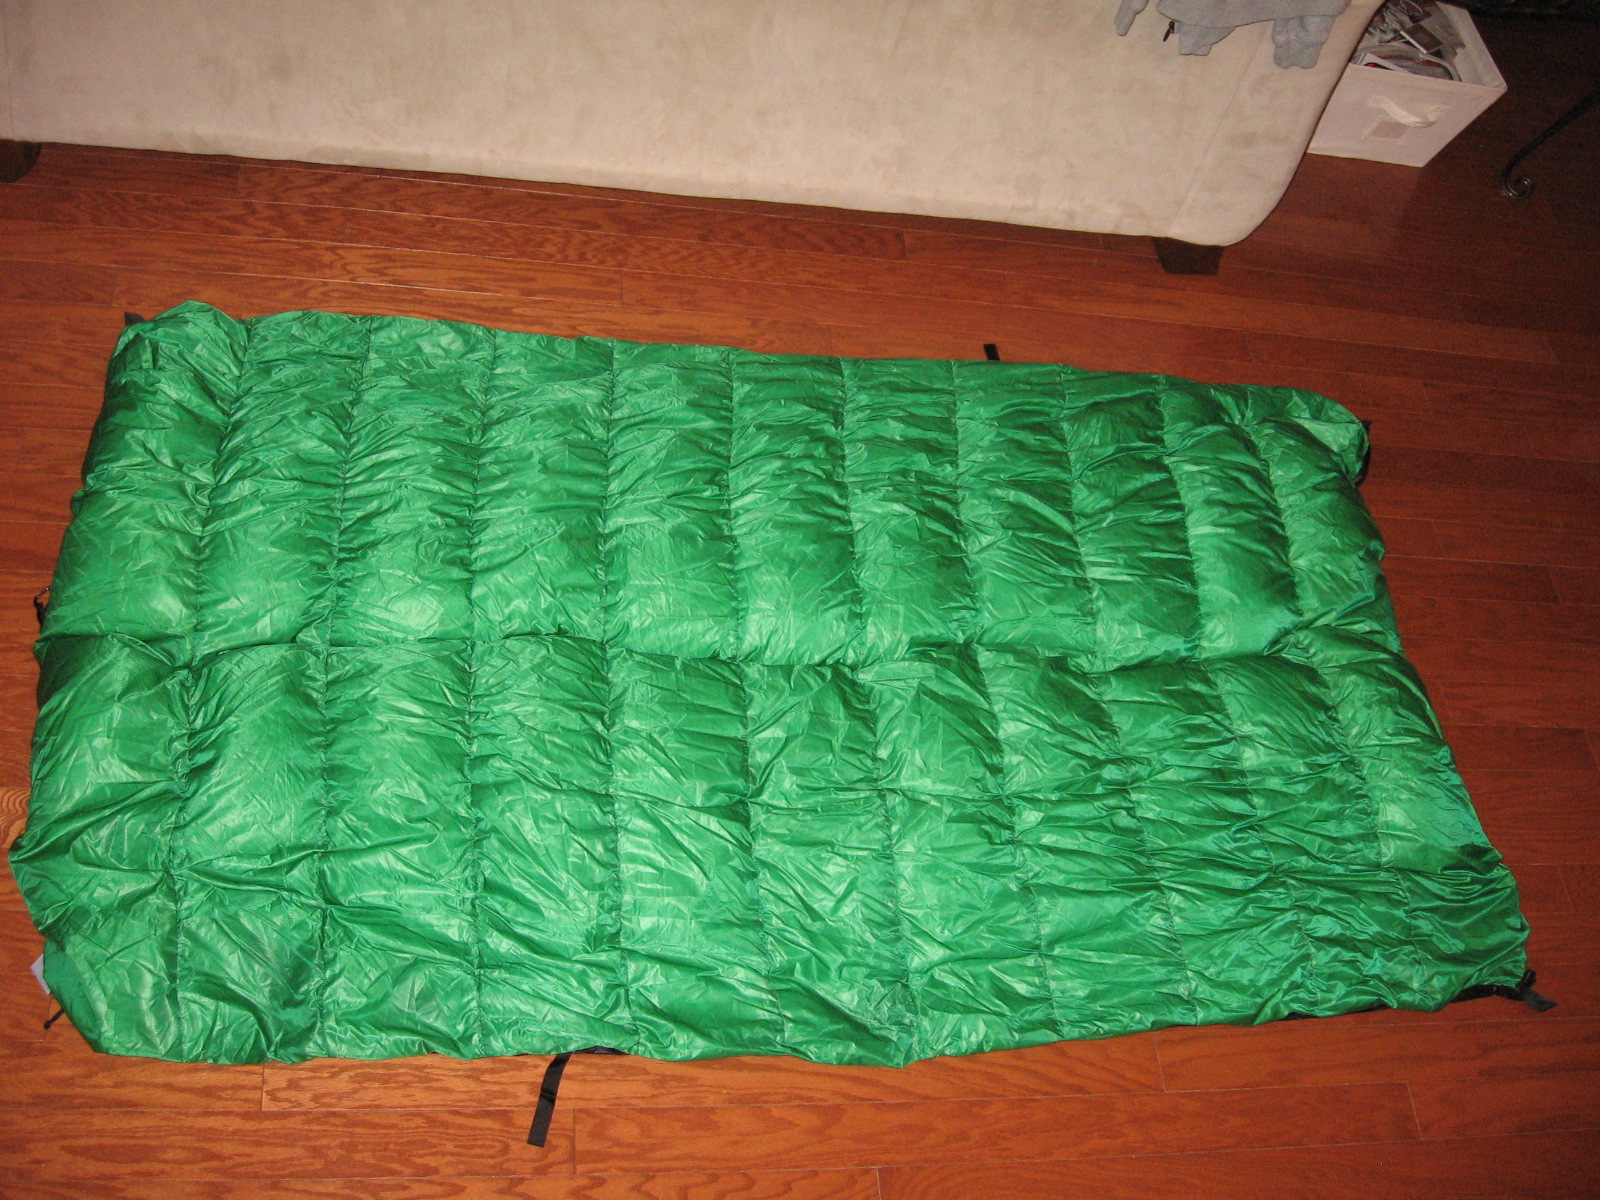 |
The basic shape is a 77" x 43" (195.6 x 109.2 cm) rectangle. It doesn't have any slits like the Nest or No Sniveler; the crease down the center is caused by different shapes of the inner and outer shells, and I think the baffles are cut on a differential as well (but I'm not going to cut it apart to find out). Ladder loops are located 24" (61 cm) from the asym corners to match the Hennessy Hammock asym tie-outs; they're made from 1" (2.5 cm) nylon webbing. |
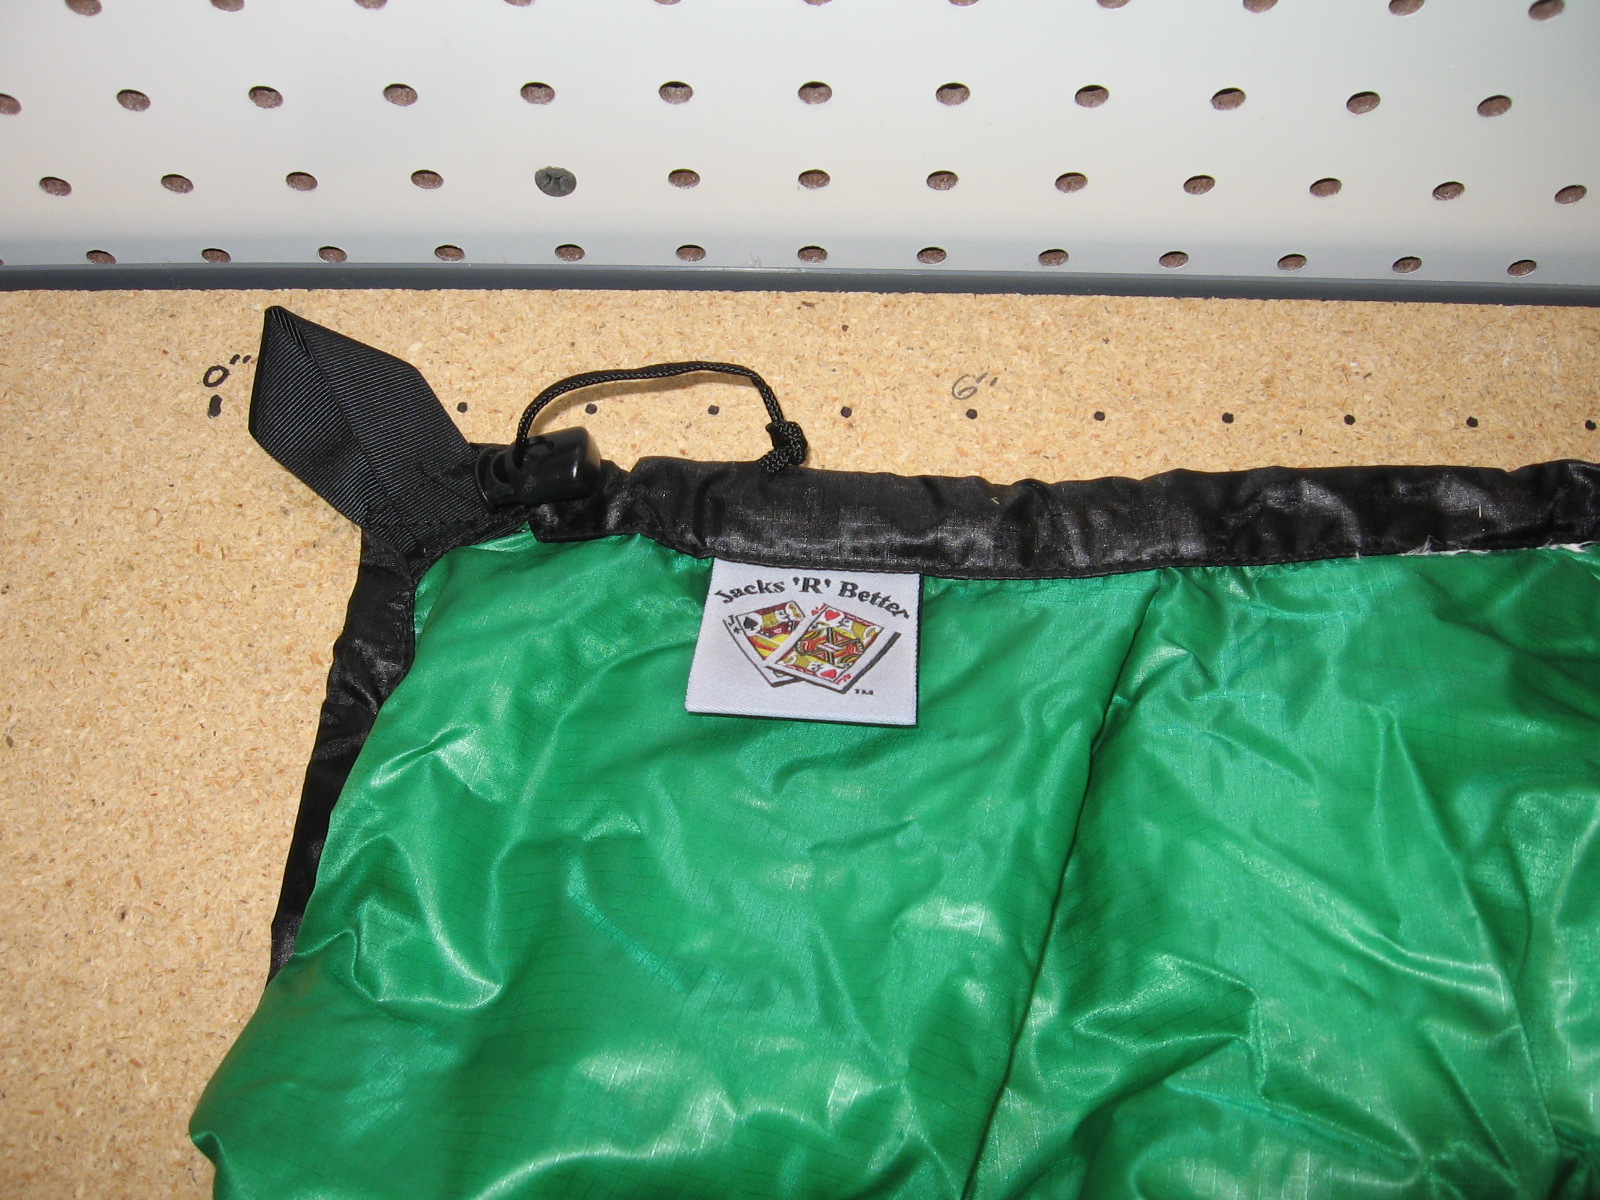 |
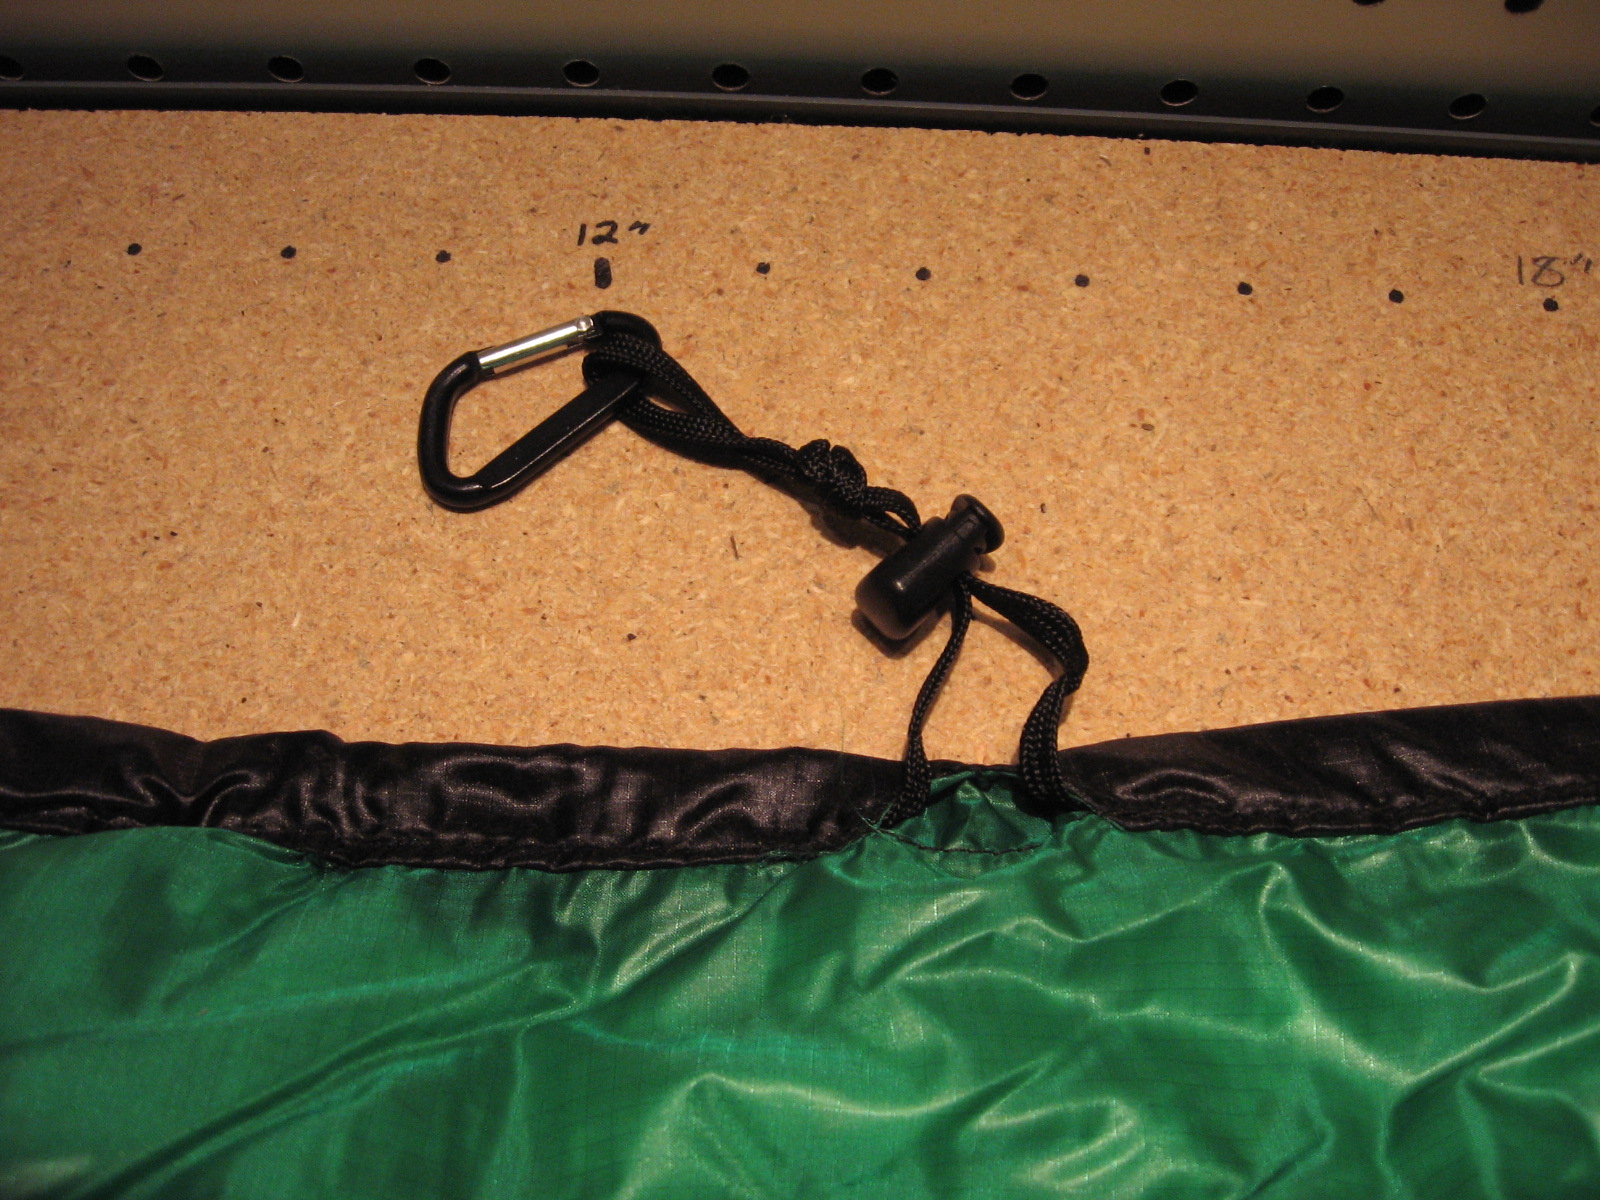
The detail of the corner shows the drawstring channel along the short edges, with a cordlock to snug the quilt's end to the hammock. Each corner also has a webbing loop used for suspending it as an underquilt. |
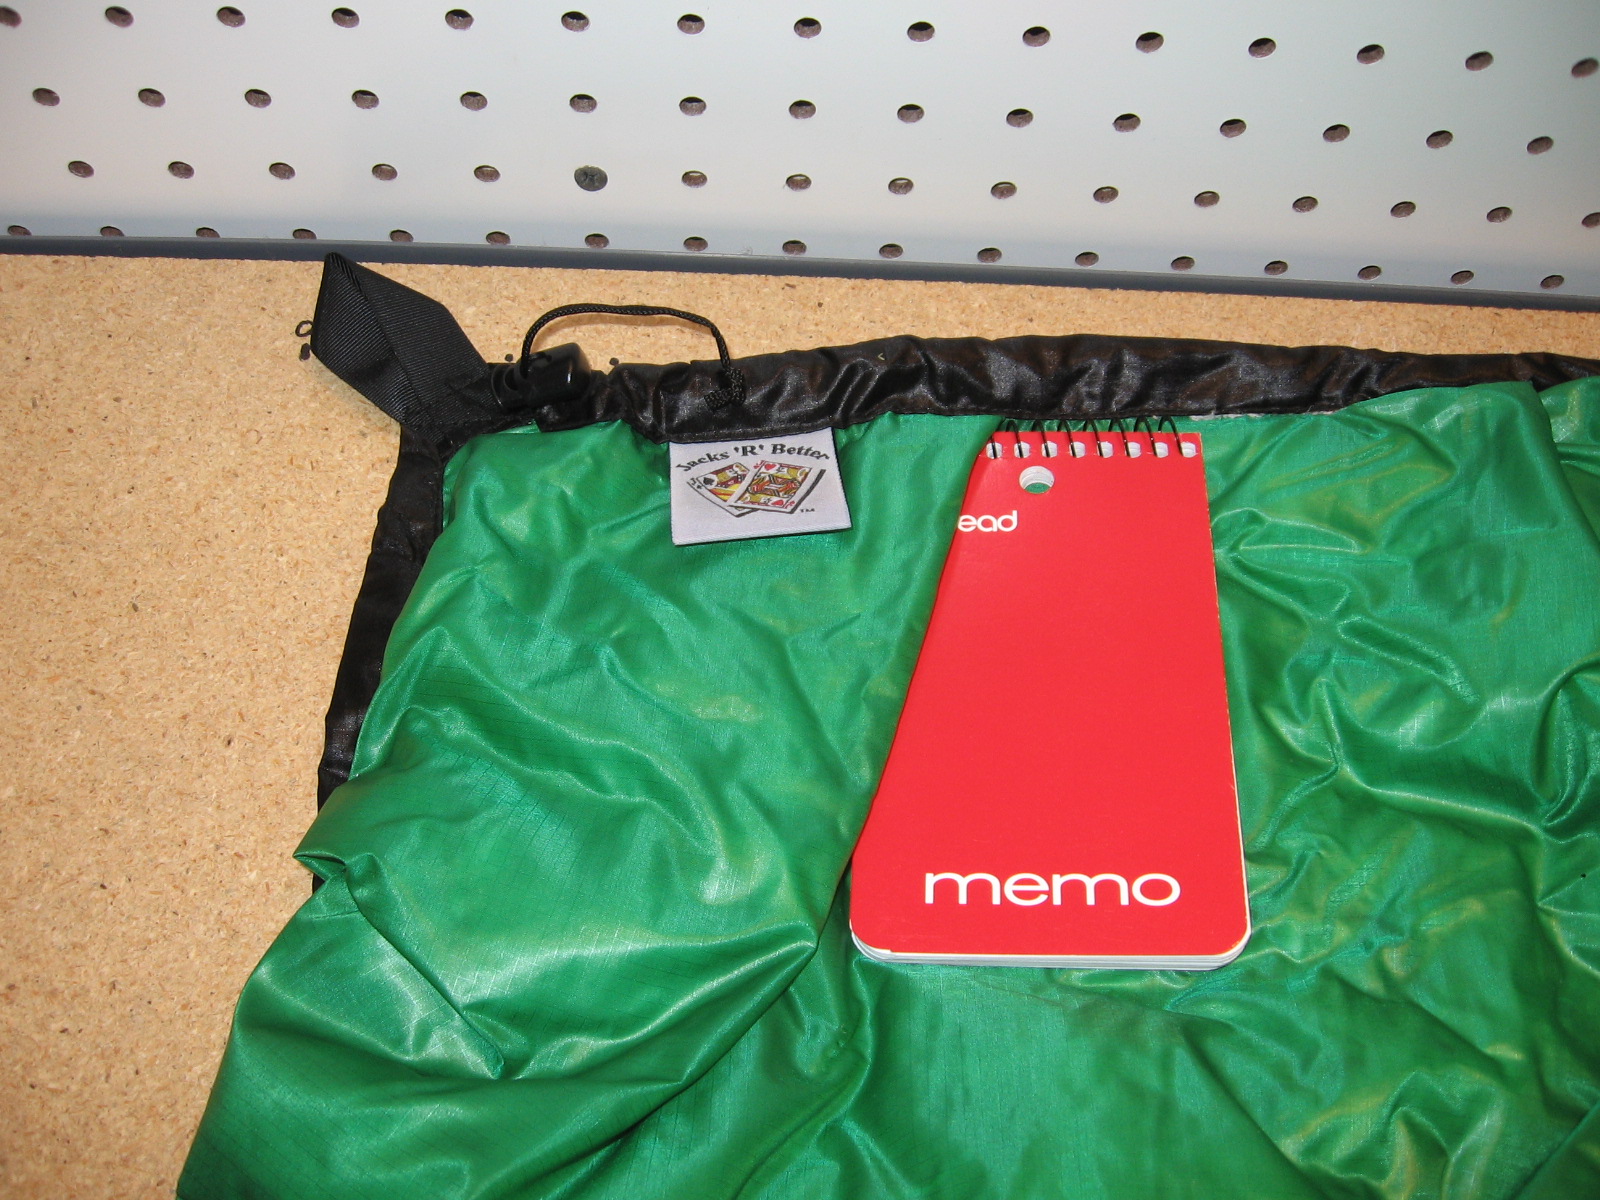 |
The outer shell contains darts so the hammock shouldn't compress the loft no matter how tightly it is attached to the hammock. I tucked the notebook inside one of the darts to illustrate it. |
 |
This detail shows the mid-point suspension addition to the head and foot end. This helps snug the quilt under gathered end hammocks (Speer and Hennessy style) so no air gaps can cause cold spots under the legs. |
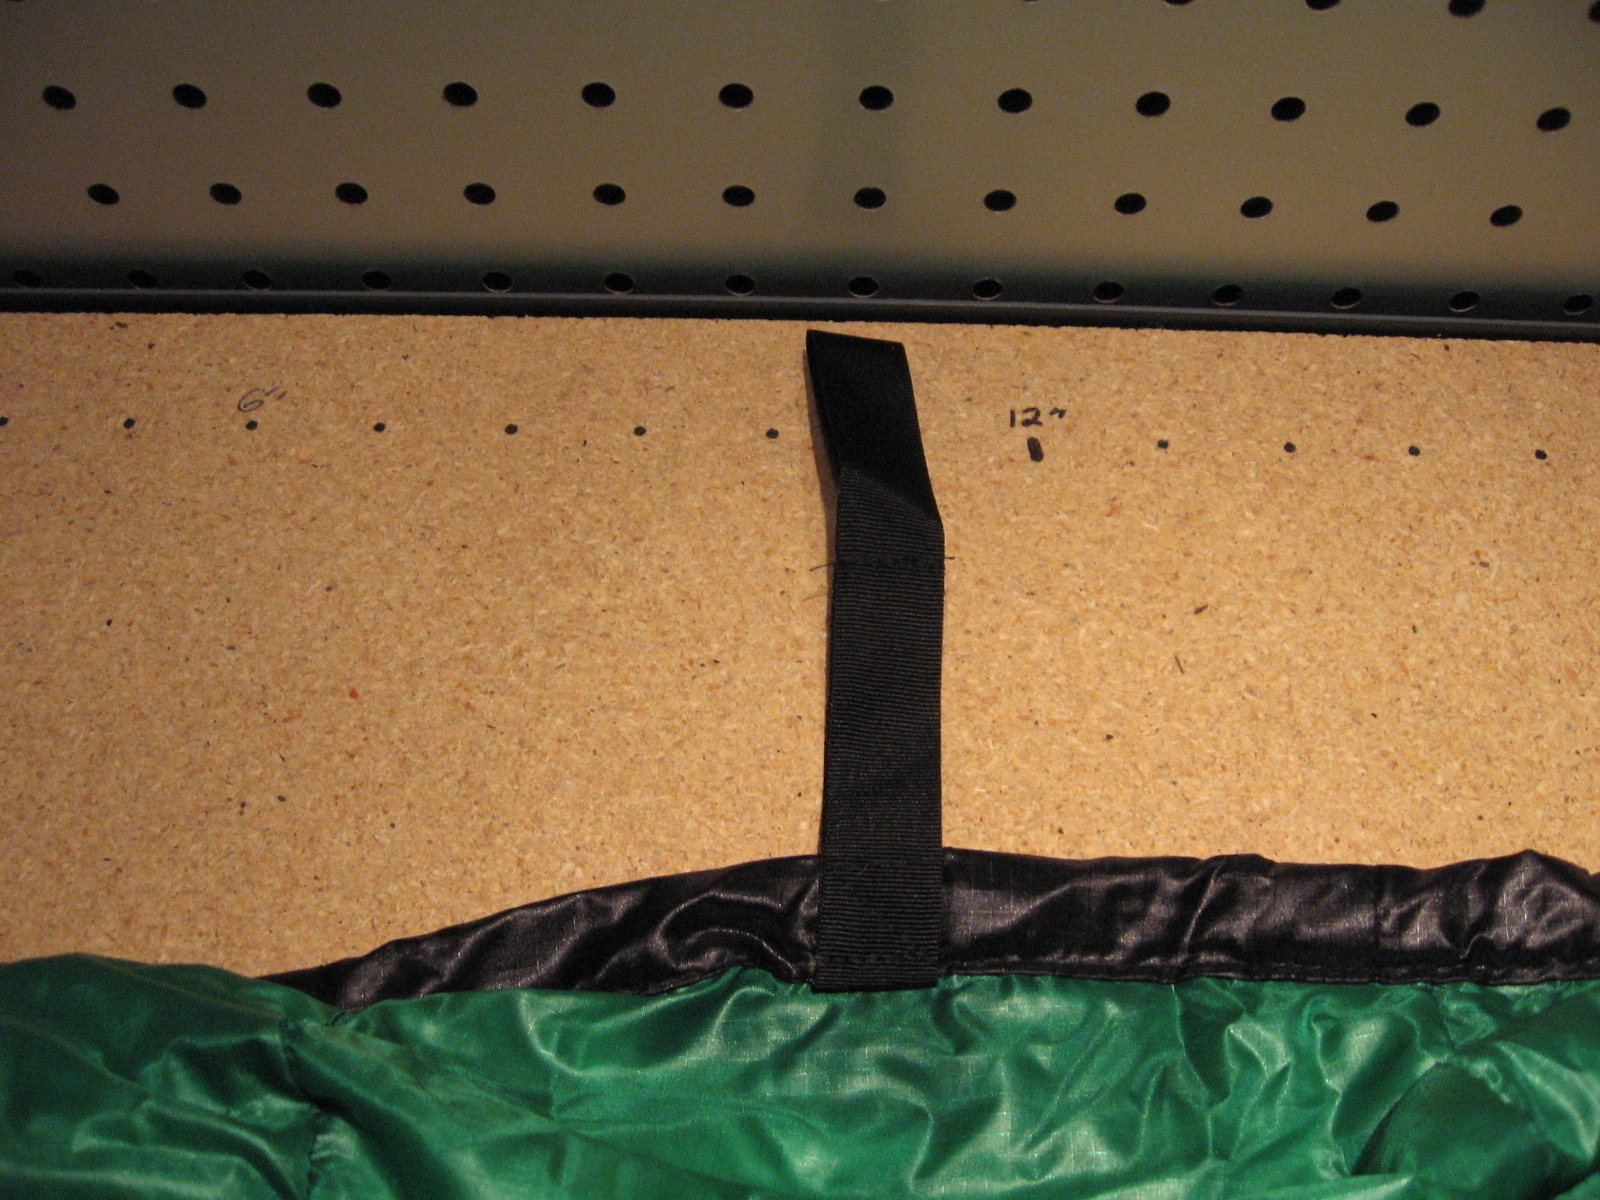 |
Detail of a ladder loop. |
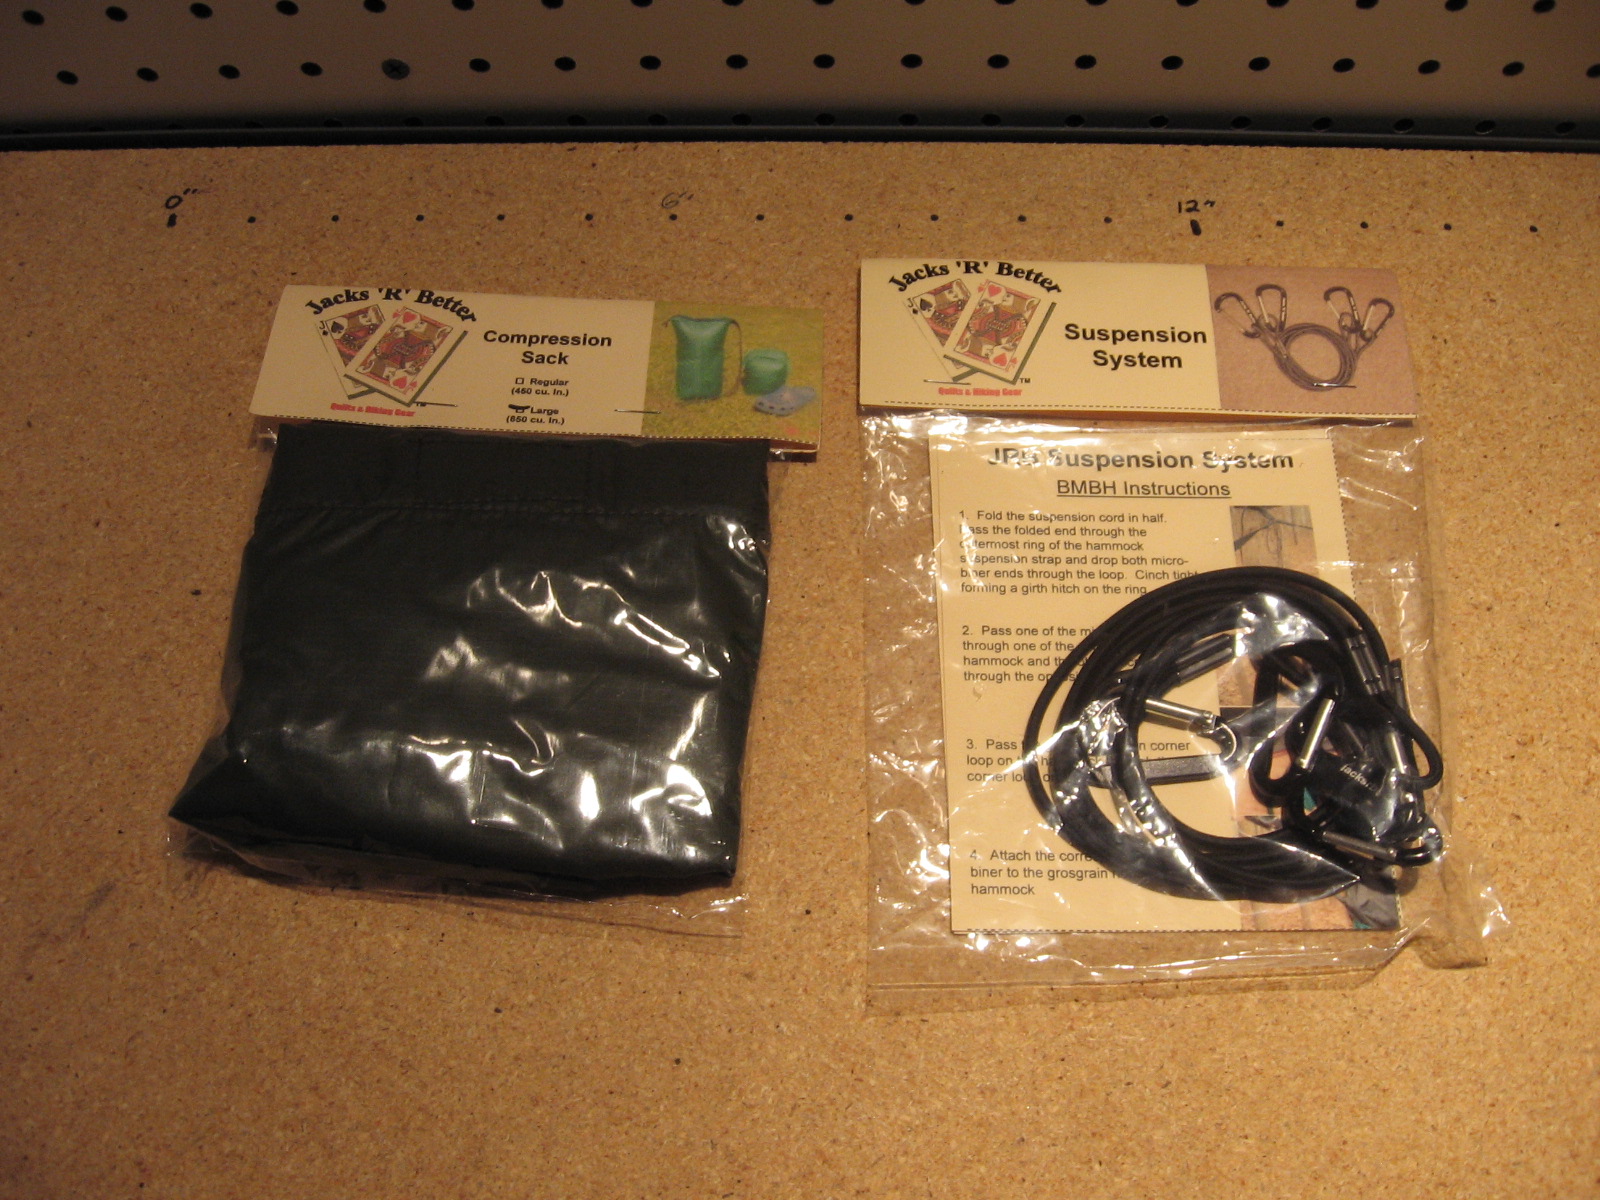 |
The quilt comes with a large JRB Compression Sack and a suspension system. The compression sack as a volume of 850 ci (14 L) and weighs 1-5/8 oz (47 g). It closes at the top with nylon webbing that wraps around the bottom of the sack and fastens with plastic D-rings. The bottom of the sack is squared, and the "extra" fabric on the corners is folded to the center and sewn together, creating a loop. Putting the webbing thru this loop keeps it from sliding off the bottom of the sack during compression.
Tightening the webbing compresses the quilt vertically. This is a very simple and lightweight method for a compression sack, but I have to make sure the contents stay centered or the package will be lopsided. Even so, this is my favorite kind of compression sack so far. One note for this particular sack...on my other JRB sacks the bottom fabric loop is lined up so the webbing runs right thru it. On this sack, the fabric loop goes in the same direction as the webbing, so the webbing has to twist around the fabric. I don't know if this was done on purpose or not....it will keep the webbing centered on the bottom but may also cause the fabric to twist or wear out sooner than the old version. I predict it will be an improvement and the wearing won't be significant. |
 |
The suspension system is two 32" (81.3 cm) pieces of shockcord with a loop at each end, and four mini carabiners (1/8 oz / 5g each), for a total suspension weight of 1 oz (30 g). See the JRB page for how to attach the suspension system. The older JRB suspension system is also pictured. It is the bigger one and weighs 1-5/8 oz (46 g). |
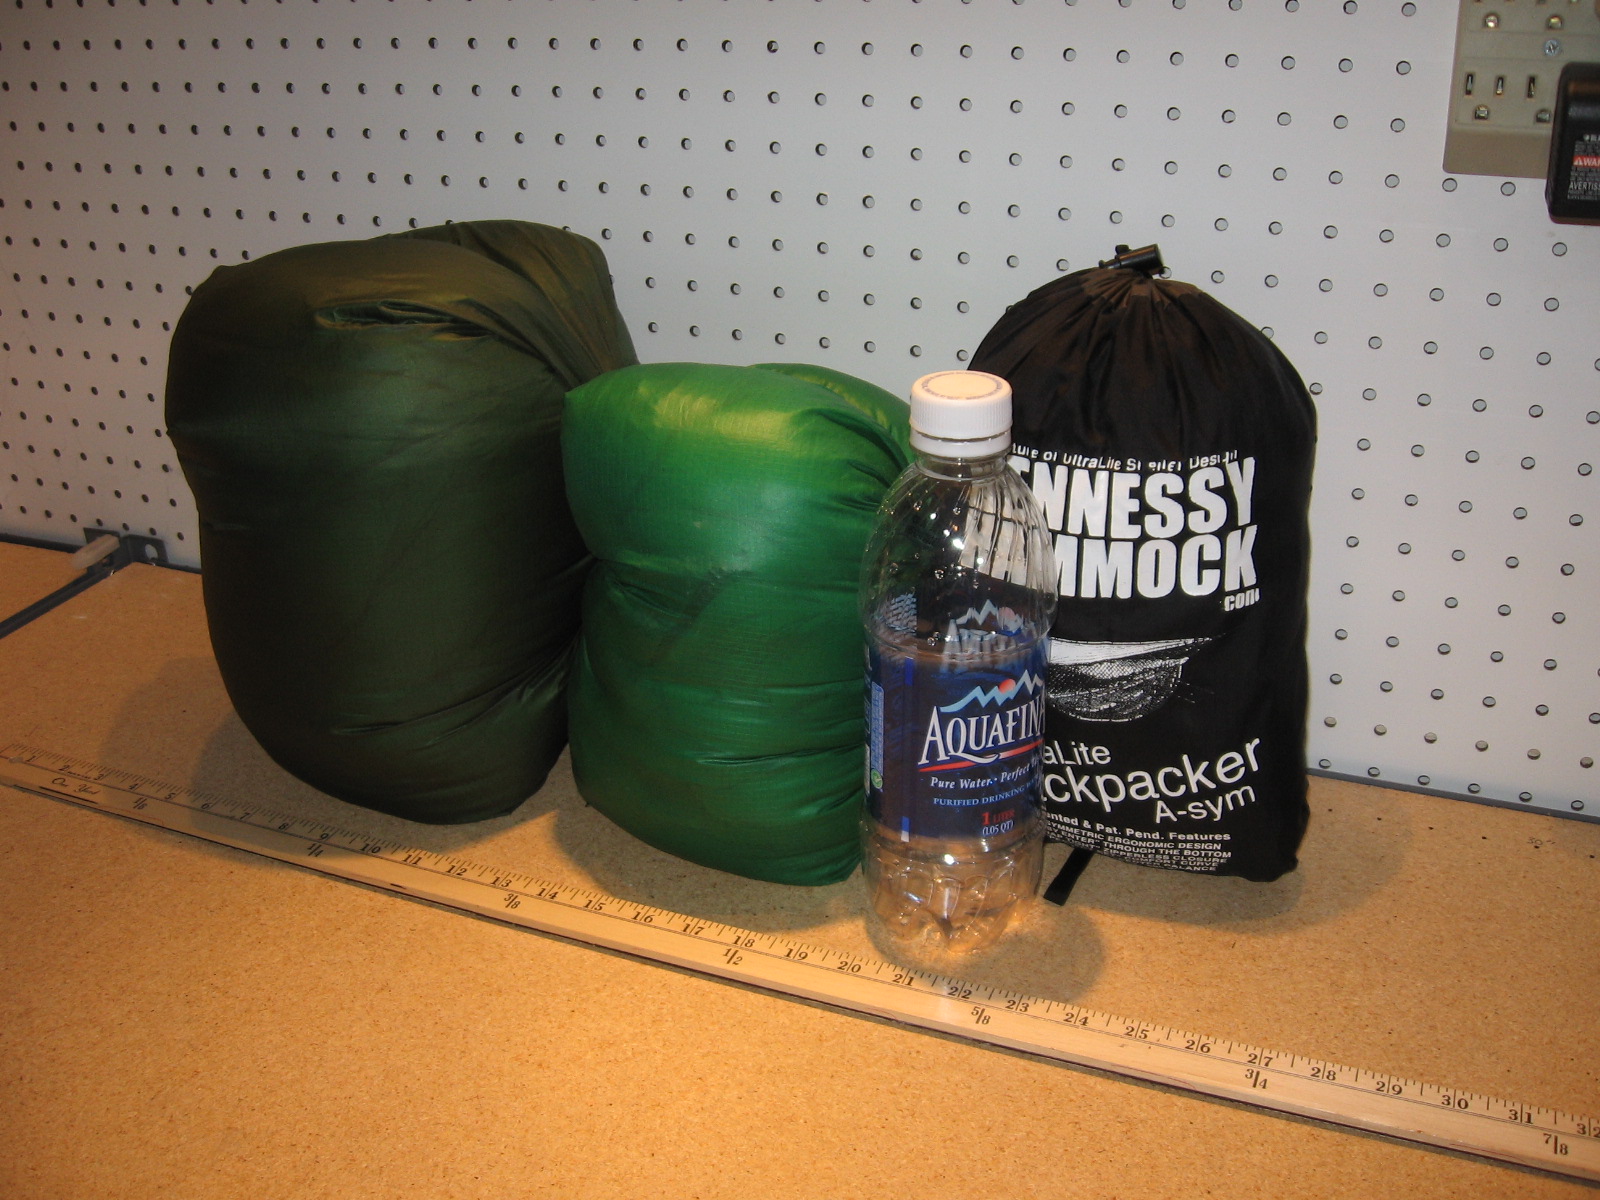 |
The MWUQ stuff sack is olive green, and I included a JRB Nest in the standard JRB compression sack for comparison. The 1 liter water bottle and Hennessy Backpacker Ultralight Asym (BULA) are there for size comparison. When uncompressed, the MWUQ fits into the compression sack at 14" x 9 " x 8" (35.6 x 22.9 x 20.3 cm) and the Nest is 11" x 7" x 6" (27.9 x 17.8 x 15.2 cm). As pictured, I compressed each to where I'm comfortable compressing my down gear. The Mt Washington measures 12" x 9" x 7.5" (30.5 x 22.9 x 19.1 cm) for a total volume of 810 ci (13.3 L). JRB advertises that the MWUQ will stuff to 9" x 8" x 8" (22.9 x 20.3 x 20.3 cm) for a total volume of 576 ci (9.5 L). I could probably compress it that much but I don't like to do that to my gear. For comparison, the Nest is 8.5" x 7" x 6" (21.6 x 17.8 x 15.2 cm) for a volume of 357 ci (5.9 L). |
 |
Here's the MWUQ on my Bear Mountain Bridge Hammock. One thing I'm concerned about is whether the wind will cut thru the uninsulated DWR ends of the hammock. This doesn't seem to be much of an issue with gathered end hammocks because underquilts seem to wrap around the head better on that style. That may be a misperception though, so I'm interested to see what happens in cold weather. |
| Initial Impressions: This is a very high quality piece of gear. It fits the BMBH very well and I couldn't feel any air gaps between the quilt and hammock. As soon as I laid down I felt the heat radiating back to me from the down. Of note, I've never felt this much heat return on my legs with an underquilt because that's where air gaps occur with most underquilts. This bodes well for the MWUQ's peformance in cold weather.
I did feel the quilt compressing a bit under my shoulders when I rolled over on my side. Even with the compression I had ~2" (5 cm) of loft. But when I rolled to a more comfortable sleeping position without so much pressure on one shoulder, the compression seemed to go away and the quilt lofted back up...so I don't expect the loft to be reduced under normal sleeping conditions. | |
| 22 Dec 08 Test - 21F | |
Weather:
Gear:
My yard was muddy from the recent rains so I set up on the back deck. It's still exposed to the wind on three sides but the house provides a pretty good windblock. I set everything up and went back inside, then went out to bed just before midnight with ~25F temps. Saw a shooting star as I was getting in, then the static lightshow that nylon gives when it's very dry outside. Humidity was the 40% range...pretty low for NC. The MWUQ was attached to the BMBH exactly as shown in the instructions. I had hung the BMBH too tightly so I had some gaps when I first got in...I lowered the hammock into the MWUQ and most of the gaps disappeared. I could feel the heat coming back to my torso almost immediately when I laid down. Good stuff. I did have some gaps on the sides of my legs, though, and I'll have to play with it to figure out how to fix it. The MWUQ was snug against the hammock along the centerline, so if I laid right down the middle even my legs were warm. The gaps started around my butt and extended to around my ankles. Since I spent most of the night sleeping on my side, kinda leaning against the left wall of the hammock, I had to adjust my legs to the warm part of the insulation. Still, I slept pretty well to the low of 21F. I woke up a few times but it wasn't b/c of cold legs. My wake-ups were b/c I was sweating inside the sleeping bag. I even tried to dress lightly, with no thermal top on under the ThermaWrap like I usually wear. Since I was zipped into the sleeping bag with the Nest on top, I had to unzip and fold the Nest down off my torso to vent. Little bit of a hassle, which makes me very excited to see how the MWUQ will perform as a top quilt. (I currently don't have a winter-worthy down sleeping bag or quilt except for the MWUQ.) Remaining items to test:
|
|
| 27 Dec 08 Setup Test | |
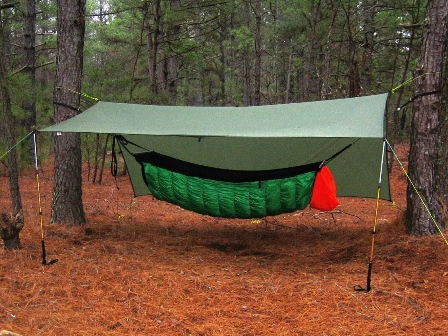 |
Here's the JRB Bear Mountain Bridge Hammock with MWUQ, 10' x 11' Cat Tarp and Self-Tensioning Lines. This was really just a setup test as I was taking pics for the Hammock Suspension page and I wanted to see how the whole system worked together. I was able to stuff everything into the Blackbishop Sack and set it up just like the other hammock/underquilt systems I use.
Fit was the same as the previous test but I only laid in it for a few minutes. |
| 16 Jan 09 Test - 11F | |
Weather:
Gear:
We finally got a good cold front that put the MWUQ to the test! I had just flown in from D.C. Friday morning (where it was 9F at takeoff) so I couldn't rightly sleep outside Friday night without making my wife mad (I only have a few priorities above hammocks, but that's one of them!), so I slipped out of bed before sunrise Saturday to set up the hammock on the back porch. Definitely a successful test...over the next few hours, the MWUQ kept me warm to a measured low of 11F. Details below... I connected the MWUQ suspension lines as described in the directions, and I used the mid-point suspension JRB adds to their quilts now. These seemed to really help the underquilt's fit underneath my knees, but I still got some gaps along the sides of my legs. This was barely an issue in the 20s because my bag provided enough insulation, but as the temps got closer to 11F I had to put a travel pillow on that spot to stay comfortable. Of note, I didn't use the HH side tie-outs and this may eliminate these cold spots. I had another issue that side tie-outs would have helped. The MWUQ is narrower than other underquilts I've used so it needs more attention to make sure I stay on the quilt. As I moved around in the hammock the MWUQ would slide towards the right enough that my back wasn't protected by the MWUQ when I laid on my right side. I had to reach out of my bag and slide the MWUQ to the left to stay warm. Using the side tie-outs would keep the MWUQ aligned so this isn't an issue...I'm just not used to using them so this might take some change in my hiking style. (As I think about it, I wonder if I had the mid-point tie-outs too tight and that caused the MWUQ to slip over to one side. Next time I'll try loosening them a bit to see if the MWUQ still lists to one side.) Right around the low temp, I got some cold butt syndrome (CBS). It wasn't cold enough to get me out of the hammock for adjustments, but I think eliminating the leg gaps would have helped with the CBS. Climbing inside the sleeping bag might have been enough to make it comfortable. One problem - after about 3 uses one of the micro-biners stopped closing all the way. I've had this problem before with similar micro-biners that I got from Walmart. I've been able to fix it but it's a little bit of a hassle in the field. This is why I like the wire-gated micro-biners better. So based on this test, I think JRB's 0-10F rating is probably accurate. I usually sleep cold so I predicted that the MWUQ would be good to ~10F for me. If I can fix the leg gap issue and pick wind-protected sites, I think I can be comfortable to 10F and acceptable to 0F. Remaining items to test:
|
|