WarmHammock Version 2
My first WarmHammock had a few issues - it was very bulky, the bottom panel wasn't big enough so the insulation compressed, and it was untreated ripstop nylon so the wind could blow right through the insulation.
My next step was the DownHammock. This was good enough to prove the concept but still had some difficulties. I fixed them so it's a usable hammock and will probably keep my underside warm to at least 20 F, but I have an idea that I think will work better for my next model...and even better than this WarmHammock, but I'll get to that in a second.
So after the DownHammock, I was thinking...for warm weather I only need a little bit of insulation. I had some extra .8" Primaloft in the closet, and with Primaloft I wouldn't need baffles. With such thin insulation using down, I'd need several baffles to keep a uniform thickness and prevent cold spots...so the weight savings of down over synthetic is marginalized, and the bulk isn't too much of an issue when it's already so small. So I decided to try another WarmHammock.
WarmHammock v2 turned out much better than the first prototype! And I kept track of the measurements this time so I'd know what size to make the undercover in case it needed adjustment. Details below, and a critique of synthetic insulated hammocks follows.
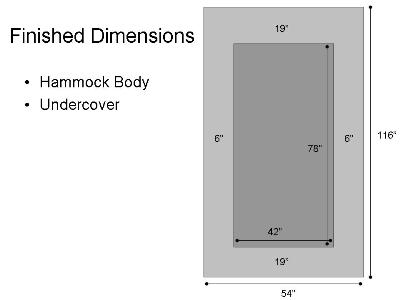
| Item | Cut Dimensions | Finished Dimensions | Weight |
| Hammock body | |||
| Undercover | |||
| PrimaLoft | |||
| Total Weight | 32-7/8 oz (938 g) | ||
 |
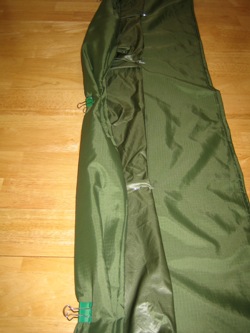
I used 1.9 oz untreated ripstop for the body, 1.1 oz DWR ripstop for the undercover, and 0.8" PrimaLoft insulation. I used a straight stitch for a rolled hem around the body, and a zigzag stitch to attach the undercover (stitch width 2.5, stitch length 3). Then I slide the PrimaLoft inside and quilted it in place.
I cut the PrimaLoft a bit big so I could adjust later - I can feel some rolls in there so I need to trim it. |
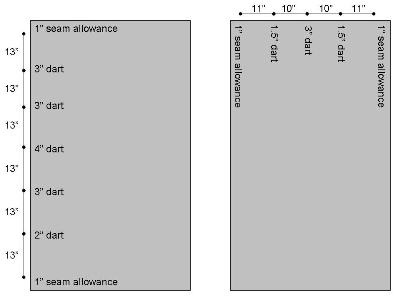 |
Undercover - Darts go down all four sides as shown. This makes a nice big undercover - a little bit less length would be ok. I think it would be good to keep that length, though, and trim some from the middle of the head and foot ends to create a shaped undercover. |
 |
It's easier to measure around the outside to place the undercover. |
 |
Showing extra darts in the middle section. And quilting loops along the edge. |
 |
Quilting loops from inside hammock. |
 |
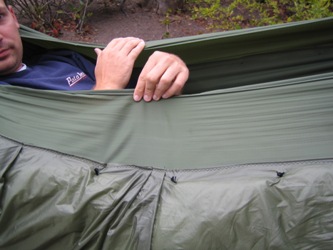
Seam connecting head end of undercover to hammock body, seen from inside. The black dot is a quilting loop. |
 |
After pinning the undercover in place, I rolled one side of the hammock into binder clips so it could go through the machine easier. It really helped! |
| Summary of WarmHammock | |
| So this is a pretty decent hammock...it's comfortable and the insulation keeps me pretty warm. But I still don't think synthetic insulated hammocks are the way to go, even with thin insulation. The main reason - the insulation doesn't conform to my body.
Synthetic insulation comes in sheets. That means that - just as with an underquilt - if you stretch it between two points it'll tend towards a straight line between those points. If your body isn't in a straight line, that means a cold spot. But then gravity is added into the equation if the insulation isn't stretched tight...the insulation sags, just like an underquilt. So the answer is to put in quilting loops. This basically solves the problem of insulating my legs, where I experience the most sag...but it takes a lot of loops to keep the insulation snug. It also puts these loops right where I'm laying, so they're exposed to friction or snagging. These still aren't really a big deal, but when the hammock changes shape as I get comfortable, the quilting loops stretch the insulation to conform to the hammock...and the insulation isn't made to take that kind of stress. It isn't like a top quilt where the shell takes all the stress...the insulation is actually pulled in this case. I think this will destroy the insulation fairly quickly, and I probably had some spots where the insulation had separated but I couldn't see inside the shell to confirm this. So the answer may seem to be using looser quilting loops. But then the loops won't hold the insulation against the hammock in all body positions. Stuffing the undercover with more insulation and making the undercover tighter might work - but then I'd lose efficiency as the insulation would be compressed...basically how my first prototype worked. Then I lose the weight advantages of using a thin layer of insulation that doesn't need baffles. So how do I address all these problems? The DownHammock again! Unlike Primaloft, down naturally conforms to its container. So if the undercover is the right size, and I fill it with the right amount of down, it'll naturally loft up against the bottom of the hammock all along my body. A few baffles around the perimeter will keep the sides insulated. I'm satisfied that version 1 proved this concept - now I just have to build v2 to get the weight down (should be ~25 oz for 10 F or so, including hammock and insulation). |
|