Jacks 'R' Better 11' x 10' Cat Tarp
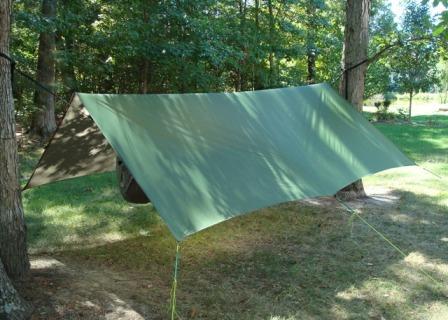
JRB 11' x 10' Cat Tarp
Photo by JRB
Manufacturer: Jacks R Better, LLC
Product: 11' x 10' Cat Tarp (2008)
MSRP: $119.95
Website: http://www.jacksrbetter.com/
| Listed Specs: | Measured Specs: | |
| Size | 11' x 10' (335 x 305 cm) | 10.9' x 10' (332 x 305 cm) |
| Weight | 19 oz (538.6 g) | Tarp: 17-1/4 oz (489 g) (w/o seamsealing) 17-5/8 oz (498 g) Stuffsack: 3/8 oz (10 g) |
PRODUCT DESCRIPTION:
When I hike alone, my smaller tarps (JRB 8x8 and MacCat Standard) give me plenty of coverage. But when I hike with my kids I like to hang on the same trees under the same tarp...and now that they've grown into full-size hammocks we don't both fit under those tarps. On the Jones Gap trip I overlapped the JRB 8x8 with the MacCat and it worked well, but it was a hassle to set it up that way...so I decided to get a bigger tarp. JRB sent me their new 11' x 10' Cat Tarp to test...just in time!
As the name implies, this tarp measures 11' by 10' (335 x 305 cm). The 11' (335 cm) side has a catenary cut between the middle tie-out and each corner; this cat cut takes up extra slack in the tarp and makes it easier to get a tight pitch. These cuts can be seen as the curves between the tie-outs in the picture at the top of the page.
The ridgeline seam runs down the center of the 11' length and has a tie-out loop in the middle, on the top side of the tarp. The 10' (305 cm) side has tie-outs at the corner, 30" (76.2 cm), 60" (middle, 152.4 cm), 90" (228.6) and the other corner (120", 305 cm). The 11' (335 cm) side has tie-outs at the corner and one in the middle.
The tarp is made from 1.1 oz silicone-impregnated ripstop nylon (silnylon). The ridgeline is a flat-felled seam and the perimeter is made from rolled hems. There is no grosgrain or trim around the perimeter.
The tarp does not come with the ridgeline seamsealed, so I hung it flat against my garage wall and used McNett's silicone to seamseal it. After I got the hang right, it took me about an hour to seal the ridgeline using only the brush that came with the McNett's. The instructions recommend concentrating on the center ridgeline tab as that area is more prone to leaking; there is a small area of extra stitching here but it was very easy to seal. The hardest part was getting the silicone underneath the felled flap of the seam.
I'm excited to fit our whole camp under one tarp and I can't wait to try out the various pitches for winter weather. The website shows two configurations I'd like to test - a Baker hut, and one with the ends folding towards each other to create doors. I still intend to decrease the weight of my main tarp so at 19 oz (538 g) it'll be a tough sell for me to use this as my primary solo tarp, but if I see huge advantages during cold weather, it's possible. But for two people it's a weight savings and much less hassle to set up.
I'll keep updating this page as I get more experience with the tarp, and eventually I'll turn it into a full review.
Discuss this test HERE.
| 25 Sep 08 - Initial Impressions | |
| Topside detail of ridgeline seam tie-out. | |
| Underside detail of ridgeline seam tie-out. | |
| Topside detail of ridgeline middle tie-out. | |
| Underside detail of ridgeline middle tie-out. | |
| Topside detail of middle tie-out. | |
| Underside detail of middle tie-out. | |
| Topside detail of a corner tie-out. | |
| Underside detail of a corner tie-out. | |
| This is a large tarp so it's a bit bulkier to pack than I'm used to. Still not so bad considering the coverage I get, though. Here it is still folded inside the stuffsack. It's smaller than a 1L AquaFina bottle. It'll probably be a little bulkier than this when I stuff it back inside though. | |
 |
Here's the large JRB Self-Tensioning Line (STL) set. It includes six STLs and two matching lines for the ridgeline tie-outs. These are very convenient for keeping the tarp taut all night, and they absorb the slack as silnylon stretches overnight. I already use these on my other tarps so it's nice to have them for this tarp as well. They're an easy DIY project as well. Mine are very similar but you can add them to any line you're already using. Instructions here. |
| 27 Dec 08 Setup Test | |
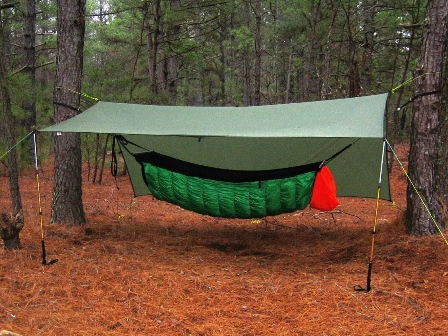 |
Here's the JRB Bear Mountain Bridge Hammock with Mount Washington Underquilt, 10' x 11' Cat Tarp pitched in a modified A-Frame, and Self-Tensioning Lines. This was really just a setup test as I was taking pics for the Hammock Suspension page.
This thing is cavernous! Lots of room under here, especially when pitched with the hiking poles to make a porch. Definitely blocks the wind better than smaller tarps since the windward side can go all the way to the ground. I need a big windstorm to see how well it stand up in use, though. At this point, I'm impressed with the quality and setup of this tarp. I'll continue testing to see how it stands up to the wind and how convenient it is in the field. I like the huge space underneath but larger tarps are a bit more cumbersome to pitch, can limit sites to larger areas, require more lines and stakes, etc...I'll have to see how this fits into my hiking style. |